Category Archives: Yarn stuff

CROCHETED BOWLS OF THE DELICIOUS T-SHIRT YARN

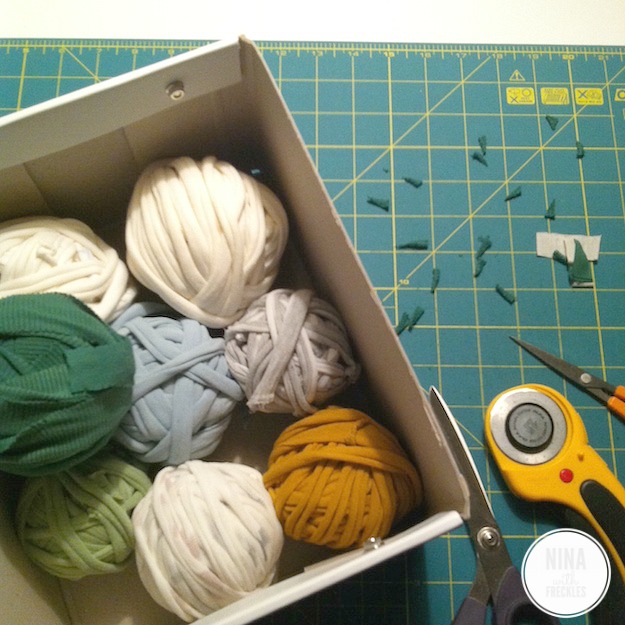
Recall my Ridiculously Delicious T-Shirt Yarn? A few weeks ago I finally got around to buying a 10-millimetre crochet hook by Addi, and since I had no energy left in my body for sitting at the sewing machine, I ended up in a horizontal state on my sofa. Invited to join were my iPad for searching yarn-bowl patterns, the new fancy hook with gold glitter in the plastic, and a box of all the yarn balls of course. I ended up using this tutorial by NimiDesign in various ways.

Nina With Freckles - T-shirt yarn bowls 1 2016-03-15

My first project was a small bowl in white, medium green, and dark green. It used up yarn cut (check out advice in my earlier blog post) from one normal white t-shirt, an extra long white t-shirt, a medium green one, and one row of the dark green. The intended recipient, my sister, already uses it in her entryway for corralling dog paraphernalia, since Miss Puppy is rather teeny tiny still, and needs to go out quite often.

This roughly corresponds to four t-shirts, which took me by complete surprise. While a perk is that such thick yarn is quickly worked, it also means I will have to be mindful how I choose to use my balls of yarn in the future, because the supply is limited after several rounds of purging the wardrobe.

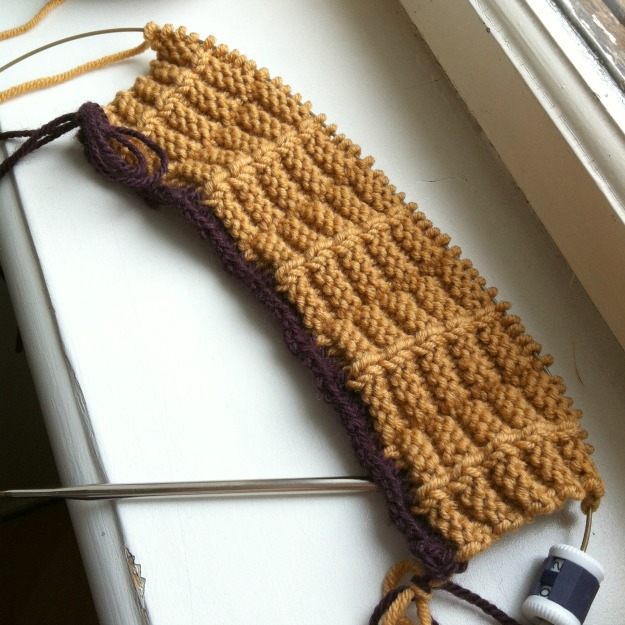
Next up was a wide, open bowl in white and a dark mustardy yellow, also for sister dearest. I never knew terrorbabies aka adorable puppies come with so much stuff, but yup, it can invade a space quickly as lightning.

Nina With Freckles - T-shirt yarn bowls 2 2016-03-15

I used three t-shirt yarns for that project, but while there was one end project shown here, I had frogged it twice. It became wobbly, or too loose and wobbly, which might work for someone else, but not me, even when this was a practice project only.

Thanks to Creativebug, at least I know chain stitch, slip stitch, and single crochet (US) now… Phew. Towards the end, my hand was quite sore from twisting the heavy thread and hook so many times, but I still kept going.

The smallest bowl is around 10 cm in diameter, and now houses keys on my entryway table, which white paint was starting to scream quietly from being scratched so brutally by metal keys. Its bottom is one whole t-shirt yarn, and then for accent I used bits of two other yarns in white and greyish blue-navy stripe.

I still have a few balls left from my cutting fest last year, and closely scrutinising other shirts have revealed that two or three more will face the rotary cutter sooner rather than later.

So, what to do with the rest? There’s still the upper portion, from armpits to neck to sleeves, to use. Currently I have a library book borrowed in which various patterns are written for t-shirt yarn, and one idea in it is to place a tennis ball inside a cover of t-shirt material, to create dryer balls. On Pinterest I’ve seen someone make similar out of old socks bundled up, so instead of a tennis ball, all the excess fabric could be bunched up into a ball, then handsewn closed. Supposedly these dryer balls fluff textiles during drying, but I have no such machine so can’t test these.

Are you sold on repurposing textiles like this or in other ways?

RIDICULOUSLY DELICIOUS T-SHIRT YARN

Nina With Freckles - T-shirt yarn 2015-11-03

If you’re following me on Instagram (@ninawithfreckles), you may have seen the t-shirt yarn, or tarn, I made yesterday. After cutting up those eight t-shirts, I added another one straight from the drying rack.

Currently, I’m deep cleaning my walk-in closet and since among others my cleaning gear is in there, I stumbled upon a stack of old t-shirts destined to be reused as something else. It’s not often that I clean my bike for instance, so despite a modest stack of items demoted to cleaning, I haven’t worked my way through these particular t-shirts in various dirty jobs around the house.

Being the frugal person I am, the thought of simply throwing out ‘good cleaning materials’ is positively mind-boggling, but I do want to declutter Stuff and so Pinterest has been my friend once again.

(A side note: I realise I haven’t updated my info here after having changed username. Very sorry about that! It’s @ninakmartin now.)

Back to t-shirt tutorials. I’ve pinned a few of them, but the one I liked best turned out to have a video as part of it. Here it is, made by Bao of Relevé Design:

Since many t-shirts have side seams, his tips shared in another blog post include scissors. I’ve treated some of the more protruding seams as he suggests.

And now my own comments on his tutorials. First of all, I like my rotary cutter. A lot. To a quilter, using an x-acto knife seems almost painful. In the next step, when cutting the final seams by hand, after a couple of t-shirts I got bored and wanted the job done quickly. Enter rotary cutter once more.

What you want to do is keep the t-shirt going through a face lift on the cutting mat. Spread out like a spider with a bazillion legs the part to be cut, then cut fabric. Slide to the right (if you’re cutting from the right side as in this tutorial; some start from the left side) the chopped off piece of yarn, and spread out the spider legs once more. Chop off yarn, spread out spider, repeat. See how I can’t chop off spider legs… I’m a delicate flower, sorry.

In some other tutorials I’ve looked at, the strips are cut much closer to the t-shirt edge (where the side seam is on some of them), but this causes a zigzag to form in the produced yarn. My recommendation is to stop at a greater distance, like in this tutorial by Bao, and that way you create a less curvy strip. If you intend to use a rotary cutter, the final diagonal snip will be swift anyway, so that part isn’t slowed down at all.

I’m sure I could think of more to share, but I’m trying to restrain the babbling a bit. As for future projects on my mind, I’ve pinned some basket tutorials to the crochet board, so check it out! There’s even a project involving ‘plarn’, not just ‘tarn’, and recycling plastic bags into yarn seems a great idea. Someone has made a laundry basket and it looks fantastic, although I may have forgotten to pin it, oops.

Have you reused t-shirts or plastic bags like this? My bee buddy Synnøve mentioned using a 12-millimetre crochet hook on spaghetti yarn (there’s a z in there somewhere but I no google now), which is a size I don’t have yet. T-shirts, however, are like Swiss train, always arriving and usually on time, so that size might be clever to invest in.

Vertical stranding, oh my!

Would you just look at these simple but stunning vertical lines across your knitting project!?

I receive the weekly review newsletter from Knitting Daily, Interweave, and a photo of the blue-grey swatch with four lines across it caught my eye. There’s a blog article Learn Something New: Vertical Stranding to go with the video and while it is a sneak peek of a workshop, I thought I’d post it. Even I could do this and it’s huge bang for the buck, wouldn’t you say?

Block 1 of Quilty Stitches

NWF Quilty stitches - Block 1

I mentioned a while ago that I had committed to make a Quilty Stitches cross-stitch sampler and here’s the first block done. I’ve done cross stitch in the past, but never fractional stitches, so that was the first thing to read up on. Actually I thought cross stitch means whole crosses and nothing else, so live and learn :)

The Swoon block was laborious to make, but also fun and pretty. The light blue is quite light, the green a medium one, and the violet a gentle kind of value but oh so difficult to photograph well. I have the same problem when taking photos of purple jewellery that I sell and in those moments I wish I had a really good camera.

As you can see I’ve already started on the second block and there’s much more counting compared to the first. Hopefully I’ll have something to show you in the coming week.

Have you joined this sampler along yet? Happy Saturday!

Quilty Stitches sampler along

NWF Quilty stitches - First cross stitches

I found a new embroidery sampler along called Quilty Stitches by Little Miss Shabby yesterday (thanks Christine!) and was naughty enough to start a new project.

I have two reasons: 1. I’ve made lots of progress this weekend in bringing forward various projects and 2. It’s small enough to fit in a pocket so it really doesn’t count (right…? feel free to enable me).

Little Miss Shabby - Quilty Stitches sampler

Just look at those tiny cross-stitch blocks! One can’t resist (I can’t resist)! While LMS uses Aida, I dived into my just-in-case boxes and pulled both linen and DMC mouliné. The piece of linen I had to cut from was a narrow strip, so my sampler will finish with next to no linen border around the cross stitches. It’s mind-boggling what I have in store in that stash of mine *shakes her head in wonder*

I thought it’d be a breeze to do cross stitching again, but I was wrong. Already in the Swoon block did I find something new to me and research began; fraction stitches… Quarter stitches and so on were a completely new concept and I also happened to start with four strands, so I ripped out the first row twice. Now I’m down on three strands and it looks better.

The floss colours are quite pastelly but I’ll use what I have in the rainbow box. There’s a bunch of floss that I haven’t wound up on the bobbins yet and there I found a couple of skeins of white. Join us, it’s fun!

Embroidery sampler 3 – Progress photo

NWF Hand Embroidery - Sampler 3 Knotted stitches progress

As you can see, I’m almost done with this third sampler of knotted stitches, but the bullion stitches are giving me so much grief that I ran out of steam. I’m figuring a progress photo might bully me into finishing the project, so I can move on to the next sampler. We’ll see…

Oh, and the fabric, I think it’s a yarn-dyed one, not Essex. Will have to consult my database and make the corrections in the two earlier sampler posts if necessary.

DMC mouliné aka The Rainbow Inheritance

My original plan was to make a fabric palette to post today, but I haven’t had the time. Instead I present to you the inherited stash of DMC mouliné. Most of the beiges, browns, and greyscale are still unwound and it took me a few evenings to sort the mess into this:

NWF DMC mouliné stash

My DMC mouliné stash

I’ve been shuffling some “bobbins” due to the embroidery samplers and the latter have eaten only a fraction of what I thought I might use up, so what’s still unwound will definitely not fit into this box. There’s no point in buying a second box, since this is not my primary craft, but we’ll see what spring and summer bring along as far as pattern design goes; I have a rainbow project in the making as we speak and I’m thinking you can guess its inspiration by now.

As for the third embroidery sampler, it’s almost finished. The bouillon stitch caused much grief until I realised my mistake and now it seems like there might be a photo to show tomorrow. Have a great day, everyone!

Embroidery sampler 2

Yesterday I showed you the first sampler and then kept working on the second and third. The tracing of the pattern was easier to do in sunlight and I was able to quickly move on to the actual embroidery. Here’s the second sampler with looped stitches:

NWF Hand Embroidery - Sampler 2 Looped stitches

Sampler 2 – Looped stitches

The stitches:

  1. Chain stitch. I practiced two different lengths.
  2. Zigzag chain stitch.
  3. Open chain.
  4. Detached chain and Lazy Daisy.
  5. Fly stitch (three clusters of stitches).
  6. Feather stitch.
  7. Buttonhole stitch.
  8. Buttonhole wheel.
  9. Couching stitch. This is my own design, the pattern calls for single couching at even intervals.

In this sampler I used the same Essex Linen by Robert Kaufman and four ply of DMC mouliné. There’s a bit less hue variation, though. The mid-blue floss used in the zigzag and buttonhole stitches was quite split up in its ply, which is why it looks so wide and it could be a good idea to try using six ply as they are without removing two first.

NWF Hand Embroidery - Sampler 2 Looped stitches traced

Sampler 2 traced

I was surprised by my relative lack of enthusiasm for these stitches. The technical nature of the zigzag chain stitch was really nice, but visually it’s not my cup of tea. The endless v letters weren’t that thrilling either, although it’s great to have seen how versatile the shape is.

My personal favourites are the chain stitch in 1. and detached chain in 4. as well as couching stitch in 9. I’m sure all three will be applied in my own designs in the future. Coming up next are the knotted stitches!

Embroidery sampler 1

Craftsy - Jessica Marquez - Design It Stitch It Hand Embroidery

I’m taking the Craftsy class Design It, Stitch It: Hand Embroidery taught by Jessica Marquez and made my first sampler yesterday. There are a total of five samplers and various stitch types are practiced in each. In this first sampler, seven different stitches were embroidered.

A specific transfer method of the pattern was demonstrated, but currently I don’t have such transfer paper, so instead I taped the printed pattern as a mirror image to the window, taped a piece of fabric on top of it and used my water-soluble pen to trace the lines.

When I compare it to the original, I can see I’ve made a mirror image, because the soluble pen should draw as is, not the reverse image. The fern stitch is the only one to scream about this “error” and in fact I didn’t even notice before writing this post.

NWF Hand Embroidery - Sampler 1 Flat stitches traced

Tracing sampler 1

In particular the two broken lines on top were a challenge, both to trace and embroider, but freehand embroidery is also a skill I guess. Here’s the finished sampler:

NWF Hand Embroidery - Sampler 1 Flat stitches

Sampler 1 – Flat stitches

I’m using lovely Essex Linen by Robert Kaufman and it’s a bit uneven, so to produce a perfectly straight line is next to impossible. I also don’t have a ruler right now, which caused slightly wobbly lines where they should have been completely straight. The stitch consistency is what matters the most, though, and I seem to be finding it.

The stitches:

  1. Running stitch.
  2. Running stitch on a curve.
  3. Back stitch. I practiced two different lengths.
  4. Back stitch on a curve.
  5. Threaded stitch, on a foundation of running stitch.
  6. Whip stitch, on a foundation of running stitch.
  7. Split stitch.
  8. Split stitch on a curve.
  9. Stem stitch.
  10. Stem stitch on a curve.
  11. Fern stitch.

I tried both the sew and stab method, but when using a 19-cm hoop I think I prefer the stab method. This was my first time using a hoop, so I can’t tell what it is like when its diametre is larger, though.

The embroidery floss is DMC mouliné and I used 4 ply consistently. I can’t tell what the specific numbers are, since most of them were inherited in a state without labels, but if you look closely, you can see I’ve used eight different hues.

I’m excited to make the next samplers and if you like for someone to teach you hand embroidery rather than learn it from books or online, I recommend this Craftsy class.

Code: Armonika Cowl – A fraction made

NWF Code Armonika - Casting on front

Code: Armonika Cowl – Right side

The yarn for my Code: Armonika Cowl arrived yesterday and I couldn’t wait to cast on. It’s an aran-weight yarn, 100% merino wool extrafine superwash, and while softer than the plum-coloured blue-faced leicester used in my Hurricane Hat, much splittier.

On the other hand, the fabric is less “fibre-y” (not sure you can call it halo in this case) and somehow slightly thicker, too. That could be because this isn’t stockinette, though. Here it is on the wrong side:

NWF Code Armonika - Casting on back

Code: Armonika Cowl – Wrong side

As you can see, there are five knit ridges on the front and only four on the back side. When I couldn’t see this in the pattern yet, I just remembered where the tail was; in the left corner on the right side.

I’m also still referring to the pattern, so the row counter is handy to keep dangling on the cable as long as I haven’t learned to read off of what I’ve made so far.

The pattern is written for straight needles, but I don’t have access to mine currently. It’s a bit more cumbersome to knit on circular needles, but progress is more important to me at this point.

The only place where I stumbled were the two first rows. I cast on with the main yarn and made the first purl row with the tail of the cast on, since I didn’t get what waste yarn meant. Luckily I referred to some project photos by Ravelry members and saw more than one picture with yarns in two colours.

A kind soul had mentioned seaming and Kitchener stitches, which led me to put two and two together. Rip it, rip it… Only an inch or so, though! And it’s forgotten now :) This is a very fun pattern!